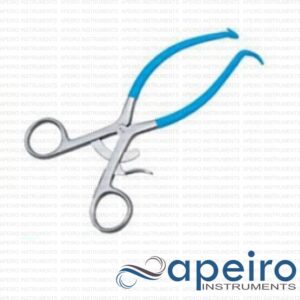
Lateral Vaginal Retractor Wide Range

$ 60.00

SKU: A24.01.03 Category:
10 People watching this product now!
Reviews (0)
0 reviews
0
0
0
0
0

There are no reviews yet.

Be the first to review “Lateral Vaginal Retractor Wide Range”

Your email address will not be published. Required fields are marked *

4 + 10 = ?

You have to be logged in to be able to add photos to your review.

Additional information
Download 2Weight0.300 kg
Apeiro InstrumentsBrand ( Manufacturer )Apeiro Instruments
ImagesMaterialStainless Steel
Download 1Sterility ConditionReusable, Autoclavable
Shipping & Delivery
De Minimis Rule Update for U.S. Customers A Comprehensive Guide by Apeiro Instruments Understanding the De Minimis Rule The De Minimis Rule, a long-standing U.S. trade policy, previously permitted goods valued at $800 or less to enter the country without customs duties or taxes. This exemption made international commerce from stores like ours faster and more affordable for U.S. customers. Key Update Summary As of August 29, 2025, the U.S. government has abolished the $800 duty-free threshold. All international shipments, regardless of value, are now subject to import duties and taxes. As the buyer, you are responsible for paying these fees upon delivery. Impact on Your Apeiro Instruments Orders This U.S. government directive applies to imports from all countries. Here’s a clear comparison: Before August 29, 2025 Items valued at $800 or less were exempt from duties and taxes, ensuring quick and cost-free entry into the U.S. After August 29, 2025 All packages, regardless of value, are now subject to customs duties, taxes, and regulatory reviews, which may increase costs and cause delays. What This Means For Your Shopping Experience: Financial Responsibility: You are responsible for paying all duties, taxes, and fees required by U.S. Customs. These are separate from our prices. Collection Process: The shipping carrier (e.g., FedEx, UPS) will collect these fees from you before finalizing delivery. Unpredictable Costs: These fees are set by the U.S. government, so we cannot predict or calculate them for you. Potential for Delays: Enhanced customs reviews may extend shipping and delivery times. Our Dedication to Your Experience While this policy is beyond our control, Apeiro Instruments remains committed to your satisfaction. We will always provide precise customs documentation with every shipment to streamline processing and are here to offer support for any documentation challenges. Official Government Resources Presidential Directive: Suspending Duty-Free De Minimis Treatment for All Countries U.S. Customs Guidance: Basic Importing and Exporting Information For personalized assistance with your order, please contact Apeiro Instruments Support.
Products Videos
Instrumenmts Care

Instruments Care

Summary: The following are guidelines of Cleaning, Sterilizing & Maintaining surgical instruments.
Use of distilled or deionized water and a neutral pH cleaning solution is recommended for all these procedures.

1. Rinsing-
Immediately after surgery, rinse instruments under warm (not hot) water. It may be helpful to use a nylon toothbrush to rinse the lock boxes and joints of the instrument. Be sure to remove all blood, body fluids, and tissue.

2. Cleaning-
If you do not clean your instruments immediately after rinsing, instruments should be submerged for a in a solution of water and neutral pH (7) detergent. They should never be placed in saline solution, as it may cause corrosion and eventually irreversible damage to the instrument.

A. Ultrasonic Cleaning-
We recommend you manually clean micro & delicate instruments.
Instruments should be processed in a cleaner for the full recommended cycle time- usually 5-10 minutes.
Place instruments in open position into the ultrasonic cleaner. Make sure that sharp blades such as scissors, knives, osteotomes, etc. do not touch other instruments.
All instruments have to be fully submerged.
Do not place dissimilar metals (stainless, copper, chrome plated etc.) in the same cleaning cycle.
Change solution frequently, at least as often as recommended by the manufacturer.
Rinse instruments after ultrasonic cleaning with distilled or deionized water to remove ultrasonic cleaning solution.

B. Automatic Washer Sterilizers-

Follow manufacturers’ recommendations. Make sure instruments are lubricated after last rinse cycle and before sterilization cycle.

C. Manual Cleaning-

Most instrument manufacturers recommend ultrasonic cleaning as the best and most effective way to clean surgical instruments, particularly those with hinges, locks, and other moving parts. If ultra sonic cleaning is not available observe the following steps.
I. Use stiff plastic cleaning brushes (nylon etc.).
Do not use steel wool or wire brushes except specially recommended stainless steel wire brushes for instruments such as bone files, or on stained areas in knurled handles.
II. Use only neutral pH (7) detergents such as the Roboz Instrument Cleaner (IC-1000) or the Roboz Enzymatic Cleaner (EC-1000.) If not rinsed off properly after cleaning, low pH detergents will breakdown the stainless protective surface and cause black staining.
High pH detergent will cause surface deposit of brown stain (this deposit may look like rust) which will also interfere with smooth operation of the instrument.
III. Brush delicate instruments carefully and, if possible, handle them totally separate from general instruments.
IV. Make sure all instrument surfaces are visibly clean and free from stains and tissue.
This is a good time to inspect each instrument for proper function and condition.
Check the following:
Scissor blades glide smoothly from open to closed (they must not be loose when in closed position). Test scissors by cutting into thin gauze. Three quarters of the length of the blade should cut all the way to the scissor tips, and not hang up.
Forceps should have properly aligned tips.
Hemostats and needle holders should not show any light between the jaws. They should lock and unlock easily and the joints should not be too loose. Check needle holders for wear at the tips.
Suction tubes should be clean inside.
Retractors should open, close and lock properly.
Blades of all cutting edges should be sharp and undamaged.
V. After manually scrubbing instruments, rinse them thoroughly under running water (distilled water is best). While rinsing, open and close scissors, hemostats, needle holders and other hinged instruments to make sure the hinge areas are rinsed out, as well as the outside of the instruments.

3. After Cleaning-
If the instruments are to be stored, let them air dry and store them in a clean and dry environment.

4. Autoclaving-
If instruments are to be reused or autoclaved:
A. Lubricate all instruments which have any metal to metal action such as scissors, hemostats, needle holders, and retractors.
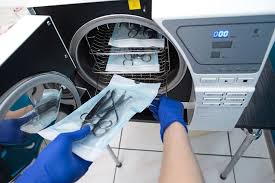
B. Use disposable paper or plastic pouches to sterilize individual instruments. Make sure you use a wide enough pouch (4” or wider) for instruments with ratchet locks such as needle holders and hemostats so the instrument can be sterilized in the open and unlocked position.
If you are autoclaving instrument sets unlock all instruments and sterilize them in an open position. Place heavy instruments at the bottom of the set (when two layers are required).
Never lock an instrument during autoclaving. It will not be sterile as the steam cannot reach the metal to metal surfaces. The instrument might develop cracks in hinged areas caused by the heat expansion during the autoclave cycle.
Do not overload the autoclave chamber. Pockets may form that do not permit steam penetration. Place a towel on bottom of pan to absorb excess moisture during autoclaving. This will reduce the chance of getting “wet packs”. Make sure the towels used in sterilization of the instruments have no detergent residue and are neutral pH(7) if immersed in water. The residue of the inexpensive, high-pH (9-13) detergents used by some laundries to clean the towels could cause stains on some instruments.
CAUTION: At the end of the autoclave cycle- before the drying cycle- unlock the autoclave door and open it more than a crack about ¾”. Then run the dry cycle for the period recommended by the autoclave manufacturer. If the autoclave door is opened fully before the drying cycle, cold room air will rush into the chamber, causing condensation on the instruments. This will result in water stains on the instruments and cause “wet packs”.
If you have unusual staining on your instruments during sterilization contact your local instrument representative or look in our web site under staining.

5. Cold Sterilization-
Most cold sterilization solutions render instruments sterile only after a 10 hour immersion. This prolonged chemical action can be more detrimental to the surgical instruments than the usual 20 minute autoclave cycle. If the instruments need to be disinfected only, cold sterilization is recommended since disinfection will take place in only 10 minutes.
Keep in mind the difference between STERILE and DISINFECTED: Sterile- an absolute term (no living organism survives); Disinfected- basically clean.
Always use the proper sterilization/cleaning technique to render the instrument in required condition for use.
Important: For instruments with tungsten carbide inserts such as needle holders, scissors, and tissue